Introduction to Day 2
In everyday's three part session henceforth, we begin with Warm ups. Today, under this, we shall be revising all that we did in the Workout on Day 1.
In the second part, under 'Workout', we will learn how to draw parallel vertical lines correctly. And yes, do not forget to play music while doing the workouts!
Under 'Sense of Perspective Space', we quickly get a grounding on the core principle on which our perspective sketching lessons are based, the different kinds of perspective and learn how to draw a cube in 2-point perspective correctly.
Preparation:
• Download and Print:
1. D2_45-deg-10cm-Cube_Solution
2. D2_30-60-deg-10cm-Cube_Solution
• Newsprint sheets (for Warm up)
• Tracing sheets (for Workout and Sense of Perspective Space, unless otherwise mentioned)
• Soft pencils - 2B, 4B, 6B, etc.
• Measuring ruler/scale (for Sense of Perspective Space exercise today)
• Long ruler and set squares preferably, for drawing the Grid.
• Music
Overall Time Plan: 1.5 hours
• Warm up : 15 mins.
• Workout : 45 mins.
• Sense of Perspective Space : 30 mins.
Warm up
Why Warm ups?
Like in sports, warm ups get body in action and in tune with the movements demanded later. Thus everyday, under Warm up, you are asked to repeat the exercises done on all earlier days WITHOUT any underlay grids used during the Workouts.
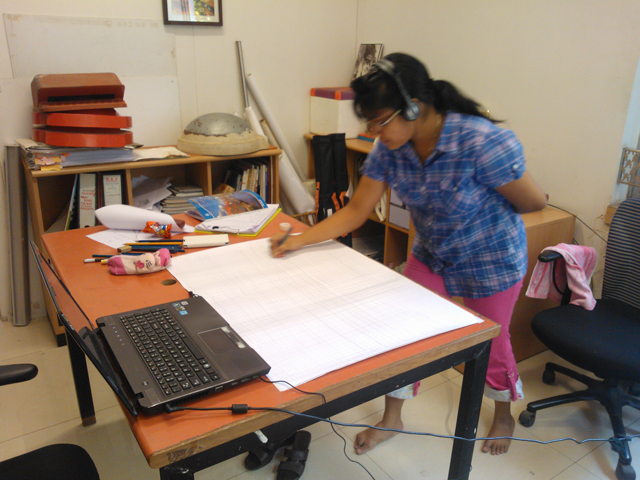
Image 2.1: Learner in action - doing the daily Warm up before beginning the Workout Session
The daily aim:
• Fluency is more important than correctness of the lines: Unlike in the workouts where the correctness of line is emphasized, for warm ups it is important that the lines are drawn fluently.
• You must keep changing the speed with which you execute the lines. We will didcuss more on this later.
The standard set up:
• You can use any cheap paper provided the surface is not too smooth and offers moderate resistance to the pencil, such as newsprint sheets. It does NOT have to be a cartridge paper. Opaqueness or transparency of the paper is also not of importance.
• Use soft pencils so that there is little resistance from the paper.
Body Posture:
• Always keep the entire body from the feet upward moving in the direction in which the lines are being drawn.
____________________________________________________________________________________________
For today's exercise, move your body horizontally along with the movement of your hand, as shown in the video 2.1 below.
Video 2.1: Body Posture for warm up practice of Parallel Horizontal Lines
4. Exercise:
Now, recall and practice drawing Parallel Horizontal Lines - Left to Right and Right to Left with variations in length. Also practice equidistant spacing by subdivision. You get 15 minutes to complete all variations.
<Warm up Ends>
________________________________________________________________________________
Workout
________________________________________________________________________________
1. Aim: Drawing Parallel Vertical Lines correctly
• Improve line quality
• Control parallel-ness of line
• Control start and end points
________________________________________________________________________________
2. Set up:
• Tracing sheets, soft pencils, music (see Preparation)
• Grid - Draw Grid G2 referring to the Grid Template Reference Sheet provided yesterday[Download....D1_Grid-Reference-Sheet-for-Workout_Session-1]. Use tracing sheets above this grid as overlay for all the workout exercises today. Preserve the grid sheet after completing the day's exercises, for later use.
DO NOT use erasers for the workouts.

Image 2.2: Grid 2_5x15 with blue horizontal lines @150mm and red vertical lines @50mm
4. Body Posture:
Video 2.1: Body Posture for drawing Vertical Lines
Note: If you do not move the upper body (torso) to make space for the forearm to move, it will obstruct the movement of the hand. Make sure that you move the upper part of the body in the direction in which the line is drawn.
________________________________________________________________________________
2.1) Parallel Vertical Lines – Top to Bottom/Equal length: 10 mins - 1 sheet
Objective: To develop control over vertical parallel lines
Draw Parallel Vertical Lines of varying length taking reference of lines on the grid G2. Try to control the end points of the line such that they are aligned along the horizontal grid lines. Adopt a body posture as shown in the video below.
Note: As discussed on previous day, your primary aim is to keep succeeding lines parallel to gridlines below. In that case of errors, leave a line gap below and start again, maintaining your lines parallel with the grid lines below.
Video 2.2: Parallel Vertical Lines from Top to Bottom
2.2) Parallel Vertical Lines - Top to Bottom/Varying Length: 5 mins - 1 sheet
Objective: To develop control to stop lines at desired length
Draw Parallel Vertical Lines of varying length (say 15cm, 30cm etc.) taking reference of the horizontal lines on the grid underlay, G2. Again, try to control the end points of the line such that they are aligned along a horizontal line, but do NOT draw any horizontal reference lines for this.
2.3) Parallel Vertical Lines - Top to Bottom/Equidistant Spacing: 10 mins - 1 sheet
Objective: To develop control on control parallel-ness of line
Now that you will have gained more confidence in drawing parallel vertical lines, try to draw 15 lines now, with equidistant spacing within each 5 cm grid. Lines to be of 15, 30, 45 and 60 cm lengths. Similar to what we did yesterday, do the following:
• Draw parallel vertical lines from top to bottom using G2 starting with 3 lines within each 5 cm grid to divide it into 4 equal parts. (shown in grey lines in image 2.3 below)
• Draw the next 4 lines, within these to make 8 equal parts (black lines in image below)
• Repeat to create 16 equal parts.
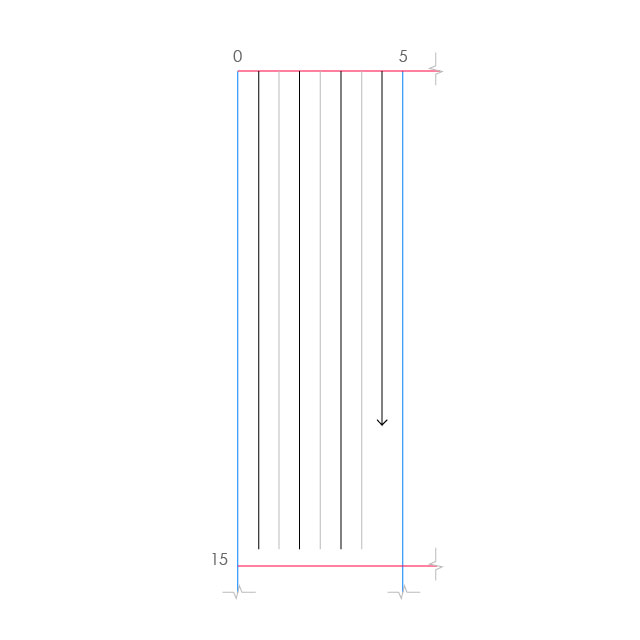
Image 2.3: Drawing Vertical Lines with Equidistant Spacing by Subdivision
2.4) Parallel Vertical Lines – Bottom to Top/Equal length: 10 mins - 1 sheet
Objective: To develop control over vertical parallel lines
Similarly, try drawing 15 parallel vertical lines but now in the reverse direction (i.e. bottom to top)
Video 2.3: Parallel Vertical Lines from Bottom to Top
2.5) Parallel Vertical Lines from Bottom to Top/Varying Length: 5 mins - 1 sheet
Objective: To develop control to stop lines at desired length
Repeat the above exercise with the new parameter of varying length (say 15cm, 30cm etc.) for bottom to top.
2.6) Parallel Vertical Lines - Bottom to Top/Equidistant Spacing: 5 mins - 1 sheet
Objective: To develop control on control parallel-ness of line
For the last 5 minutes of today's workout session, practice drawing 15 lines, with equidistant spacing within each 5 cm grid, now drawing from bottom to top. Lines are to be of 15, 30, 45 and 60 cm lengths.
A lot of learners change the grip when switching between vertical and horizontal and when changing the directions of drawing the line. Do you? We will see how this habit can be done away with through a simple technique called 'Signature Grip' discussed on Day 5, in Session-2 later.
________________________________________________________________________________
How well did you do in the Workout today?
Here are two samples of good and bad output by learners of the workout you just did, to judge your progress.
Do LOGIN to create a personal account of your daily progress, under PROGRESS DIARY. Through this you can also UPLOAD your work at the end of each day for peer/expert reviews and feedback on the FREEHAND SKETCHING DISCUSSION GROUP on d'square.

Image: day2-good-workout-sample
Image: day2-bad-workout-sample
<Workout Ends>
________________________________________________________________________________
Sense of Perspective Space
IMPORTANT NOTE: The course does not intend to teach the theory of perspective. You can refer related books to understand the key concepts like (a) vanishing points, horizon line and picture plane, (b) all parallel edges converging on a common vanishing point, (c) eye level and its effects on perspective, (d) 45 degree, 30-60 degree and one point perspectives, (e) true height and so on. You can also refer the course on Product Drawing, also available on this d'source website, for some quick definitions.
The primary motive behind all the perspective sketching lessons we provide here is simple - how to sketch in perspective accurately - without depending on any elaborate traditional perspective drawing techniques.
The invaluable principle we have adopted to take all the hassle out of perspective sketching is this - "You can draw an accurate perspective if you begin with a correctly drawn Cube in perspective." Since now the Cube can be used as a reference to begin with and extended in 3 dimensions. Why? Because the cube is a 'perspective unit' available - to measure height, width and depth concurrently. Theoretically, the perspective cube can be multiplied and divided into any combination of height, width and depth to provide a basis for drawing any object. (For more detailed theory on this, refer to the book by Doblin J., mentioned below)
Note that we have followed the standard convention of starting all of our perspectives henceforth, from a basic unit cube (1l x 1b x 1h) in 2-point perspective.

Image 2.4: The basic unit cube in 2-Point Perspective
For more on this, refer to Doblin J., (1974) Perspective, a new system for designers, Whitney Publications, N.Y. which deals with the idea that it is possible to draw an accurate perspective by using cube as an underlay. (Although it is an old publication, it is still available as a new as well as a used book on Amazon. The author considers it as a must read if one wants to develop intricate freehand perspectives).
Why 2-point Perspective?
Why choose 2-point perspective over 1-point, 3-point or other forms of perspective for sketching? 2-point perspective gives the following distinct advantages:
(a) Only 2 vanishing points are required and they lie on the same horizon line, parallel to the ground.

Image 2.5: 2-Point Perspective with 2 Vanishing Points
(b) Vertical lines are parallel to each other, and distances on it can be directly measured, without any perspective manipulation.

Image 2.6: Vertical lines are seen parallel in this 2-Point Perspective photo of a night skyline taken from afar
(c) All CAD perspectives are 3-point, but can distort the object. 2-point perspectives look more realistic. When the camera is far away, the perspective looks realistic as in the image 2.6 shown above. Else the buildings look tapered, as in the image 2.7 below. Since, in this case the third vanishing point lies above, all vertical lines seem to be tapering upwards towards it.


Image 2.8: 3-Point Perspective of Cube with the third Vanishing Point lying below horizon line
Note: The Vanishing Points in both cases lie on the same horizon line.
For more on 3-point perspective, refer to Jay Doblin's book mentioned earlier. Once you know the basics, you can draw any perspective. Let us start by drawing the Unit Cube in perspective.
________________________________________________________________________________
1. Aim: Drawing a Cube in Perspective correctly
(Cube is oriented at (i) 45 deg or
(ii) 30-60 deg to Picture Plane)
As discussed earlier, understanding how to get a correct base cube will ensure accuracy in whatever we draw in perspective space derived from them.
________________________________________________________________________________
2. Set up:
Tracing sheets, measuring ruler.
Note: You are asked to sketch perspectives on tracing sheets everyday to enable error checking by superimposing on solution sheets provided at the end of each exercise. DO NOT TRACE OR REFER to the downloaded comarison/solution sheets before completing the exercises. In cases where you need to begin with reference base cubes/floor grids, due instructions will be provided.
3. Exercise:
1. Observe the two perspective views of a 10cm cube below. The first cube is oriented at 45 degrees, and the second at 30-60 degree with respect to the picture plane.
2. Use a measuring ruler ONLY for the first step - to mark the near-edge length AA' of 10 cm on your tracing sheet.
3. Now, using your freehand sketching ability, repeat these two perspective cubes accurately.
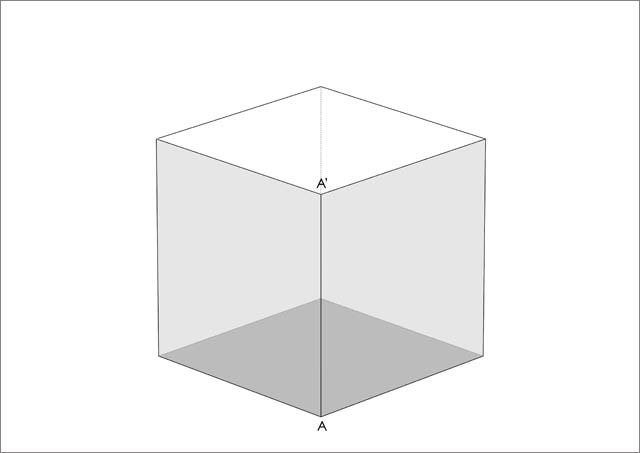
Image 2.9: 10cm 45 Degree Cube
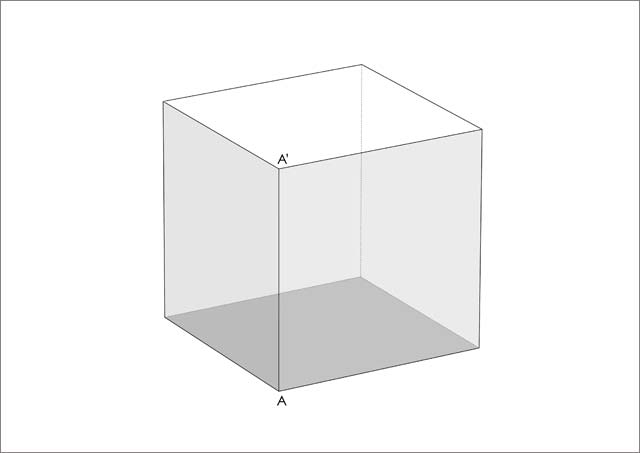
Image 2.10: 10cm 30-60 Degree Cube
3. Review: Are both your perspective cubes accurate?
1. Download and print the two comparison sheets provided. ReferIMPORTANT PRINTING INSTRUCTION below before printing [Download...D2_45-deg-10cm-Cube_Solution] [D2_30-60-deg-10cm-Cube_Solution].
IMPORTANT PRINTING INSTRUCTION: Henceforth, remember to set page size to A4 and choose 'Fit to Printable Area' option while printing the pdf sheets we have provided. It ensures all exercise base template/ comparison/solution sheets represent correct dimensions. This is to enable quick and easy cross-check of errors of the exercises we will be doing daily.
2. In this case, a correct print will have the near-edge marked AA' as 10cm on the print-out.
3. Now, align your drawn cube's nearest vertical edge to lie exactly over the corresponding printed cube in each case, here marked AA'.
3. This should give clues to the mistakes quickly.

Image 2.11: A learner cross-checking for errors over the comparison sheet after doing the exercise
(a) Check the following for 45 degree cube:
1. Is the vertical line nearest to you larger than the other distant vertical lines?
As the vertical edges go away from you, they should become smaller. (AA' > DD', BB')
2. Are all vertical edges drawn as correct verticals?
If so they will also be parallel in perspective.
3. Extend the following set of edges to see if they vanish at the same point.
D'C', A'B', AB must converge, so must B'C', A'D' and AD. You can paste your sketch on a larger paper and check if these lines vanish. They should vanish at two vanishing points on extreme edge of the paper. Are both the vanishing point on a horizontal line?
4. Is the diagonal D'B' a horizontal line?
5. Is AM marginally greater than MC'?
(b) Check the following for 30-60 degree cube:
1. Is the vertical edge nearest to you larger than the other distant vertical edges?
As the vertical edges go away from you, they should become smaller. (AA'> BB' > DD')
2. Extend the following set of edges to see if they vanish at the same point.
D'C', A'B', AB must converge at a point away and B'C', A'D', AD must converge at a point closer. You can paste your sketch on a larger paper and check if they vanish. They should vanish at two vanishing points, both on the same horizontal line.
3. In this cube, does the diagonal D'B' tilt downward toward B' and diagonal A'C' tilt rightwards toward C'?
4. Check diagonal (A'M is marginally greater than MC')
5. If you compare the width of planes as seen, KA is greater than LA
________________________________________________________________________________
How well did you do in the Perspective section today?
Here are two samples of good and bad output by learners of the workout you just did, to judge your progress.
Do LOGIN to create a personal account of your daily progress, under PROGRESS DIARY. Through this you can also UPLOAD your work at the end of each day for peer/expert reviews and feedback on the FREEHAND SKETCHING DISCUSSION GROUP on d'square.

Image: day2-good-perspective-sample

Image: day2-bad-perspective-sample
<Sense of Perspective Space and Day 2 End>
________________________________________________________________________________
Day 3 Preview
Tomorrow we begin with Warm ups, reviewing what we did yesterday and today, and learn how to draw parallel lines while changing pace or starting/ending away from grid in Workout. Under Sense of Perspective Space, we learn how to draw cuboids in 2-point perspective accurately.
Downloads for Day 3: See PRINTING INSTRUCTION first.
1. D3_45-deg-5cm-Cube
2. D3_30-60-deg-5cm-Cube
3. D3_45-deg-1x2.5x1.5_Solution
4. D3_45-deg-1x2.25x2.25_Solution
5. D3_30-60-deg-1x2.5 x1.5_Solution
6. D3_30-60-deg-1x2.25x2.25_Solution
________________________________________________________________________________