Introduction to Day 13
Today, under Warm up, we quickly revise all that we did in the Workouts in Sessions 1-3.
Under Workouts, we introduce the use of a 'shroud' during practice.
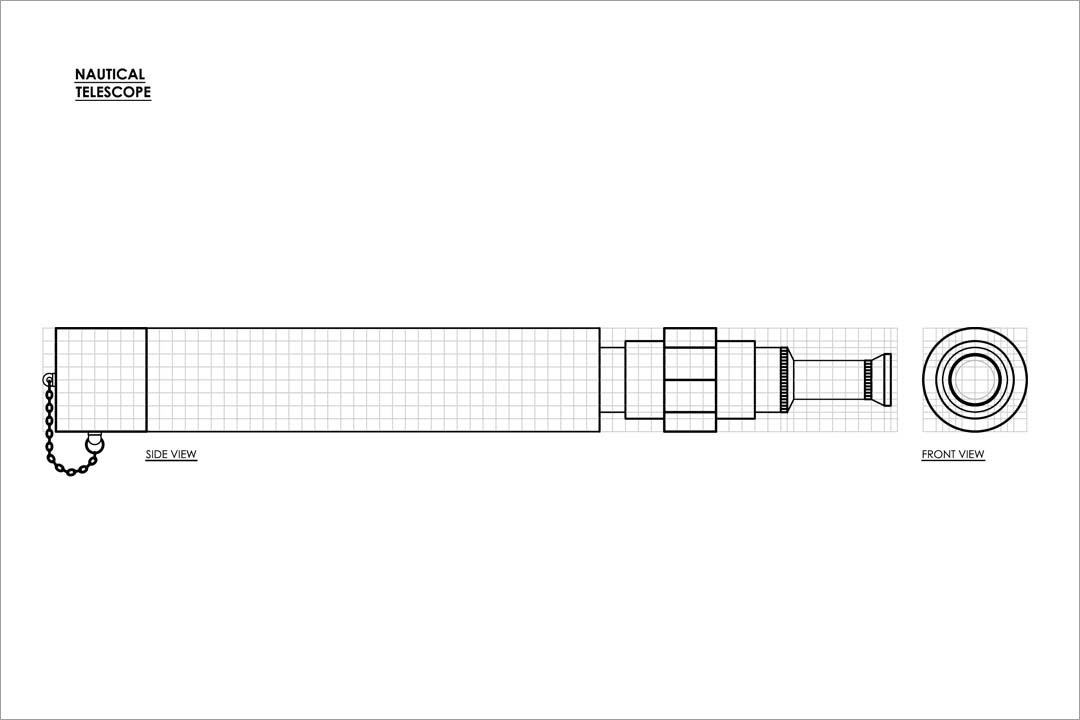
For Sense of Perspective Space, we learn how to draw a horizontal cylindrical object of varying radii, and sketch a telescope for this exercise.
Preparation:
• Download and Print:
1. D13_Shroud-Template
2. D9_Grid-reference-sheet-for-session-3-4-5 (Optional if preserved from Day 9)
3. D13_Telescope_Exercise
4. D13_Circular-Planes-in-Perspective_Horizontal-Reference-Grid
5. D13_Telescope-Part-a_Solution
6. D13_Telescope-Part-b_Solution
• Card Paper/ Mountboard or any other stiff paper (A4 size) - 1 sheet (to create a Shroud)
• Rubberband/ cellotape (to mount Shroud onto wrist)
• Newsprint sheets, Tracing sheets, Soft pencils, Measuring ruler
Overall Time Plan:
• Warm up: 15 mins
• Workout : 40 mins
• Sense of Perspective Space: 90 mins.
Warm up
15 minute Exercise:
0-5 mins : Practice very fast hand and body movements while drawing Lines - Horizontal, Vertical and Inclined - at 45, 30 and 60 degrees), followed by all kinds of Curvatures recalling all earlier sessions.
5-15 mins : Now, repeat the various workouts covered in Session-1-3 WITHOUT the underlay grids, using the hand NOT normally used.
While drawing these, remember to:
1. Draw them for various lengths, and diameters.
2. Draw lines in either direction and curvatures, both clockwise and anti-clockwise.
3. Draw them at various pace - fast, slow, fast to slow in a single line, etc.
This practice of initially drawing the lines fast and then slowing down will help your body get into smoother drawing action for the workouts and perspective exercises ahead.
<Warm up Ends>
Workout
1. Aim: Drawing using Shroud
• End points - Try to control the start and end-points despite shroud - slowing down near end points helps in this. Use of grid underlay can help check alignment achieved for each set of lines after drawing.
• End Line quality - Ensure that the straight lines drawn are actually straight and the curves are really smooth curves.
Further, maintain Equidistant spacing and the Signature Grip while drawing.
2. Set up:
• Download and prepare your shroud - Take a print of the shroud template provided [Download...D13_Shroud-Template] and paste this on any stiff paper. Cut along dotted lines, including the central strip for the drawing tool to pass through. Reinforce the areas marked with grey lines with cellophane tape to prevent tearing. While practicing, use a rubberband/ cellotape to mount it onto your wrist, as shown in the image 13.2 below.
Shroud!!! - red

Image 13.1: Shroud Template

Image 13.2: Shroud mounted on the wrist
3. Exercises:
Parallel Lines: Horizontal and Vertical, Inclined Lines: 45, 30 and 60 degrees, Circles: Circles, Ellipses, Quadrants and Segments, using Shroud
Variations explored: All variations
Shroud
Do your eyes keep following your line while sketching? This happens naturally, but for freehand sketching, we must be able to 'feel' the lines we are drawing - simply through our body movement. How do we accomplish this?
We find that the introduction of a 'Shroud' forces you to shift from the habit of visual judgement of line.
Thus we use a Shroud as our new practice tool. Observe the following video.
Video 13.1: Use of Shroud
[Read more...Draw when you can't see what you draw]
Note: Drawing with a shroud needs some getting used to, but once you do get accustomed, you will notice hardly any difference between drawing with or without shroud. A shroud ensures that you no more judge the line straightness with your eyes, but with your body - an important step towards freehand sketching.
Design your own session today:
2. Instructions
Pick any 2 lengths of each variety under each of the broad categories of:
(a) Parallel Lines: Horizontal and Vertical
(b) Inclined Lines: 45, 30 and 60 degrees
(c) Circles: Circles, Ellipses, Quadrants and Segments
Draw sets of 10-15 lines for each variation, as elucidated below on a dense square, i.e. 5x5 grid, GT12 [Download...D9_Grid-reference-sheet-for-session-3-4-5] . At places, do try change in direction (left to right, right to left, etc.) and conscious speed control (fast, slow, change of pace in a single line, etc.)
Note: Filling an entire sheet with the same type of line is NOT important, but practicing all varieties covered until now is.

Image 13.3: Shroud Practice Sample Sheet
< Workout Ends >
Sense of Perspective Space
1. Aim: Drawing a Horizontal Cylindrical Object of Varying Radii: Telescope
(Telescope is oriented at 45 deg to Picture Plane)
2. Set up:
Tracing sheets, measuring ruler.
3. Exercise:
Provided below is the Plan and Elevation of a Telescope [Download...D13_Telescope_Exercise]. Using an overlay on the base reference sheet [Download...D13_Circular-Planes-in-Perspective_Horizontal-Reference-Grid], draw a 3D view of the same.
Note: Not all reference ellipses that required to complete the sketch are marked on the grid provided below. You are to create your own ellipses of intermediate radii, taking reference of nearest ones already provided. tHE TEMPLATE WILL NEED TO BE EXTENDED BY YOU DURING THE EXERCISE.
PUT DIMENSIONS - WORKSHEET + TEMPLATE!!! - CHECK 45 DEGREENESS OF TEMPLATE - UNSYMMETRICAL NOW!

Image 13.4: Telescope Worksheet

Image 13.5: Circular Planes in Perspective Grid in Horizontal Orientation
3. Review:
Compare your drawing by overlaying it on a correctly printed version of the solution provided in two parts below. [Download...D13_Telescope-Part-a_Solution, D13_Telescope-Part-b_Solution]
< Sense of Perspective Space and Day 13 End >