Introduction to Day 16
Today, under Warm up, we quickly revise all Workouts in Sessions 1-4, and upto Day 15.
For Workout test, we do a body movement and line quality self-assessment through composition sheets, using radial lines.
In today's Sense of Perspective Space: Test, you can use floor grids to generate your own Product Based Underlay to sketch the a composite, filleted form of a Digital Calendar
1. D15_Switchboard_Exercise
2. D15_30-60-deg-Floor-Grid-with-additional-reference-lines
3. D15_Switchboard_Solution
Warm up
15 minute Exercise:
0-5 mins : Practice very fast hand and body movements while drawing Horizontal, Vertical and Inclined Lines, Curvatures, and Radial Lines and Rings, recalling this and all earlier sessions.
5-10 mins : Now, repeat the various workouts covered in Session-1-4, i.e. upto previous day WITHOUT the underlay grids using a SHROUD. Combining a shroud with the warm up exercise brings to focus both speed as well as fluency of drawing the lines.
While drawing these, remember to:
1. Draw them for various lengths, and diameters.
2. Draw lines in either direction and curvatures, both clockwise and anti-clockwise.
REMOVED PT3
Again, this practice of initially drawing the lines fast and then slowing down will help your body get into smoother drawing action for the workouts and perspective exercises ahead.
<Warm up Ends>
Workout Test
1. Aim: Drawing radial line variations accurately
• Free flow of lines is of utmost importance. Maintain uniformity of size, thickness and pressure.
Instructions:
use of single line drawing
no wrist bend
Keep hand perpendicular to board edge
• Do NOT use grids.
• Do NOT mark points or use any reference lines, unless specifically mentioned.
• Do NOT lift your pen while drawing.
• Do NOT use erasers.
Note: Use cartridge paper, and strictly NO grid templates!
1. Task-1: Draw Radial line rings:
(b) converging - with outer radius 20 cm and inner radius 10 cm
(a) diverging - with inner radius 5cm and outer radius 15 cm - with SHROUD
2. Task-2: Radial lines about an implied centre:
Note: It is important to maintain consistency of line lengths so that the final composition looks neat and pleasing.
3. Task-3: Radial lines along a path:
• Draw a series of radial lines (of 15 cm each) on a curvilinear path in the shown direction, as indicated in the test sheet. It should resemble a sinuous path. Its inner radius is 5 cm.
INNERexchange diagram seqRADIUS notify (i) - NOT MENTIONED!!!- REF. CENTRE PT.??
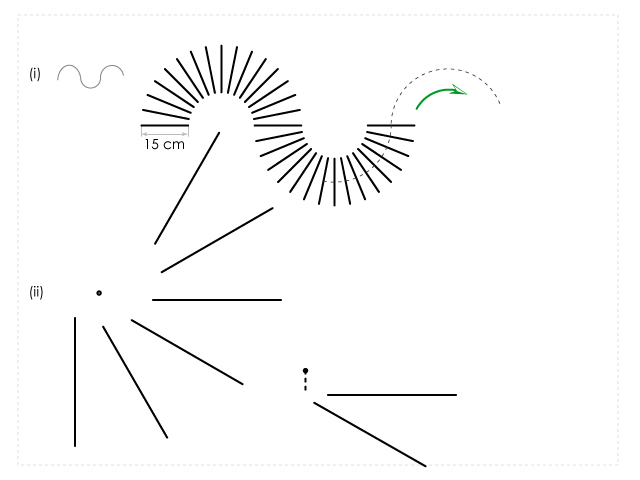
Image 16.1: Workout (i) and (ii)
(4) Task-4: Radial lines forming involutes: Practice drawing both formations in either directions i.e.:
(iii) Start with the largest length , proceed inwards, as in (iii), image 16.2 below, then
(iv) Start with the smallest length (say 1cm), proceed outwards, as in (iv) below.
Start by drawing largest length (say 15cm), going inwards with decreasing length (1cm) (15. Practice similarly for smallest to largest length outwards.REWRITE
Note: It is important to maintain good density.
REMOVE SNAILS!
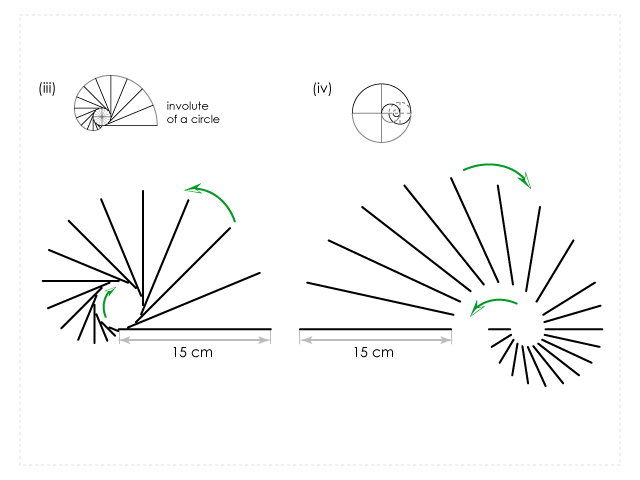
Image 16.2: Workout Test Sheet-2
Video reqd. for above 16.2
3. Task-3: Radial lines and estimation of right angles:
Draw rectangles of length 15cm and breadth 3cm around a point, as shown in (v) below. Try to do this using continuous line.
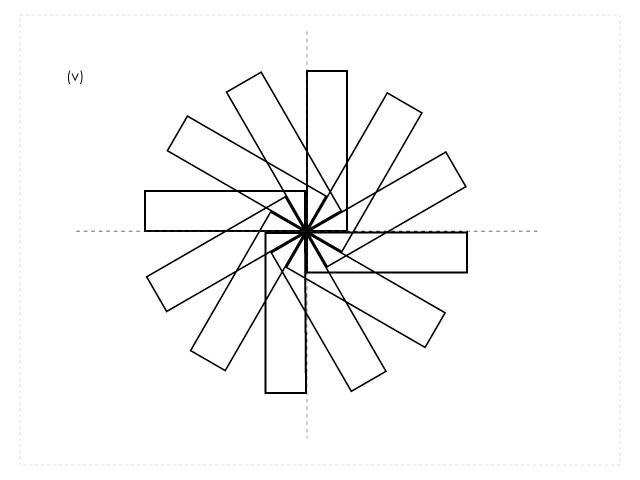
Image 16.3: Workout Test (v)
Floral patterns with radially oriented elliptical loops: using a single, continuous line starting at the centre (without lifting your pencil), recreate the patterns shown on the test sheet. Use 10 cm and 6 cm as major and minor axis values. Double the number of loops to get the second pattern.
Note: There is a sense of radial axis here. Try to maintain line consistency, and the elliptical nature of the connected loops.
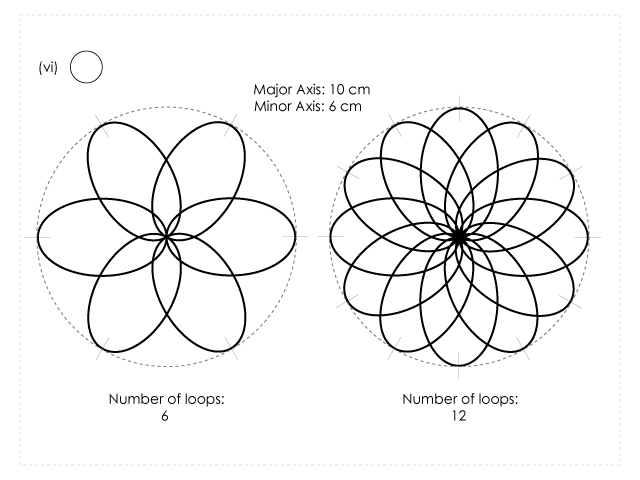
Image 16.4: Workout Test Sheet-4
Did you find drawing patterns using a single continuous line difficult? The subsequent session is dedicated to such lines, i.e. sinuous lines and springs, and is a good starting point for improve this skill!
<Workout Ends>
Sense of Perspective Space: Test
1. Aim: Drawing a Composite Filleted Object: Digital Calendar
2. Set up:
Tracing sheets, measuring ruler.
3. Exercise:
Provided below is the Plan, Side Elevation and Front Face View of a Digital Calendar [Download...D16_Digital Calendar Worksheet]. Using the technique of creating Product Based Underlays learnt on the previous day, and the base floor grids provided, draw 3D views for:
(a) Object oriented at 45 degrees. [Download...10cm 45 Degree Base Floor Grid].
(b) Object oriented at 30-60 degrees. [Download...10cm 30-60 Degree Base Floor Grid], also try drawing
(c) Object oriented at 60-30 degrees. [Download...10cm 60-30 Degree Base Floor Grid]
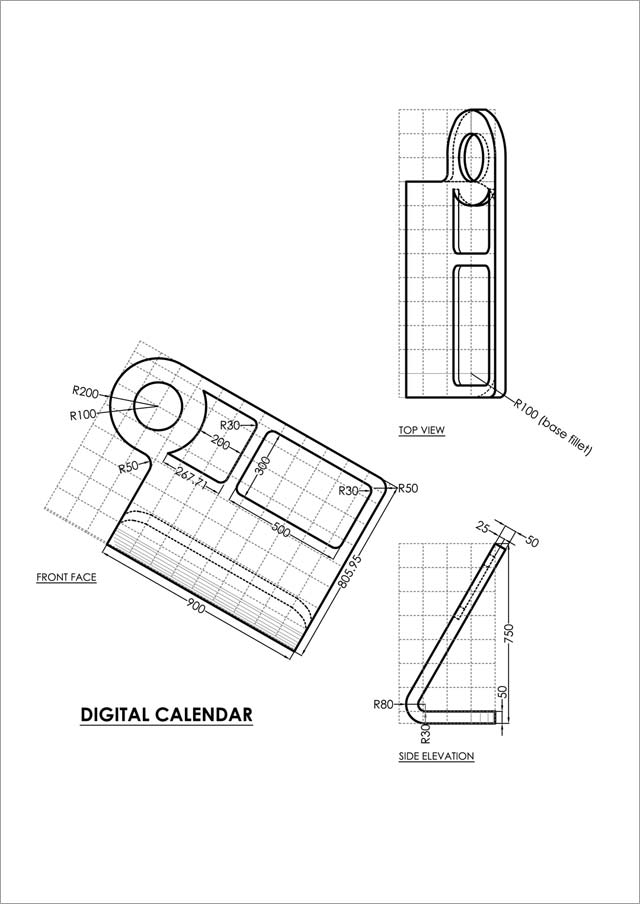
Image 16.5: Digital Calendar Worksheet
4. Review:
After you finish, review the composition by superimposing the tracing paper you drew on over a correctly printed solution sheet [D16_Digital Calendar at 45 deg._Solution] [D16_Digital Calendar at 30-60 deg._Solution] [D16_Digital Calendar at 60-30 deg._Solution]
Note: Since the digital calendar is a rather planar product, the 60-30 angle view, which shows more of the longer side of the object works best.
< Sense of Perspective Space and Day 16 End >
<< End of SESSION 4: Radial Lines + Horizontal Cylindrical Objects in 2pt. Pers. + Fillets >>