Introduction to Day 17
Today, under Warm up, we quickly revise all Workouts in Sessions 1-4, and upto Day 16.
In today's Workout, we work on our skill of drawing lines and curvatures using different tools.
Under Sense of Perspective Space, we learn how to extend a cube in One-Point Perspective.
Preparation:
• Download and Print:
1. D9_Grid-Reference-Sheet-for-Workout_Sessions-3-4-5
(Optional if preserved from Day 9)
2. D17_5cm-One-Point-Perspective-Floor-Grid
3. D17_Horizontal-Extension-of-Cube-in-1pt-Pers_Solution
4. D17_Vertical-Extension-of-Cube-in-1pt-Pers_Solution
• Different drawing tools
• Tracing sheets
• Measuring ruler/scale
• Music
Overall Time Plan:
• Warm up : 15 mins.
• Workout : 60 mins.
• Sense of Perspective Space : 90 mins.
Warm up
15 minute Exercise:
0-5 mins : Practice very fast hand and body movements while drawing Horizontal, Vertical and Inclined Lines, Curvatures, and Radial Lines and Rings, recalling all earlier sessions.
5-15 mins : Now, repeat the various workouts covered in Session-1-4 WITHOUT the underlay grids. We use a SHROUD again today. Combining a shroud with the warm up exercise brings to focus both speed as well as fluency of drawing the lines.
While drawing these, remember to:
1. Draw them for various lengths, and diameters.
2. Draw lines in either direction and curvatures, both clockwise and anti-clockwise.
3. Draw them at various pace - fast, slow, fast to slow in a single line, etc.
This practice of initially drawing the lines fast and then slowing down will help your body get into smoother drawing action for the workouts and perspective exercises ahead.
<Warm up Ends>
Workout
1. Aim: Drawing with different tools
Today's practice session is dedicated to changing tools while drawing. Practicing with various tools is important for three primary reasons:
(a) Fluency: to get better control and fluency on each tool
(b) Speed: to understand and get accustomed to the 'comfort speed' of each tool
(c) Grip: to identify and become familiar with the correct grip for each tool.
2. Set up: You can use grids today. Use the tools listed below:
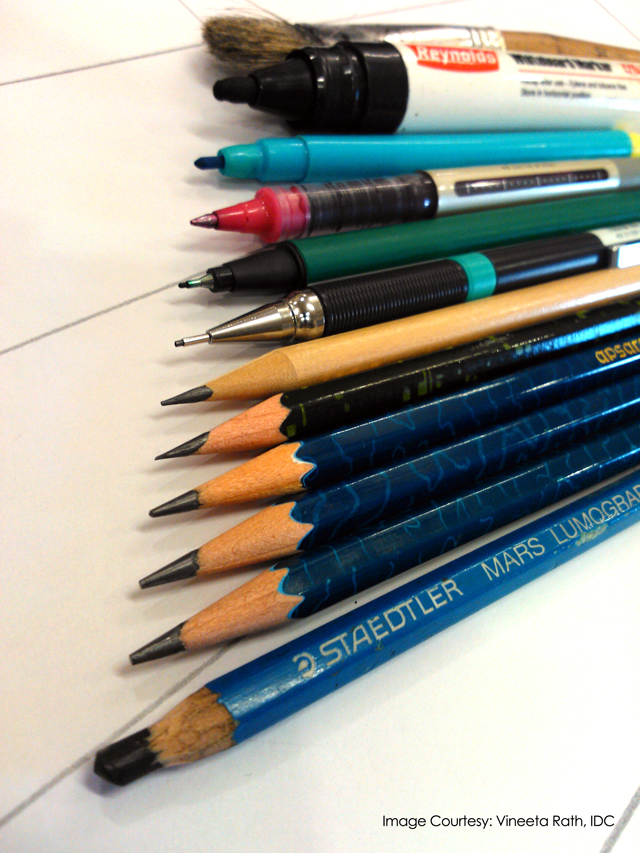
Image 17.1: Different drawing tools for practice
(a) Hard pencils (of Grades H and 2H)
Since Hard(H) pencils (say 2H, 4H etc.) offer more resistance while drawing, as compared to the softer Black(B) pencils, (such as 2B, 4B, etc.), the tracing sheet is more prone to tearing, prompting you to use appropriate pressure and maintain grip angle.
(b) Pastels and (c) Paintbrushes of Sizes 0,6,12
Again, for either of these tools, maintaining same thickness of line is possible only through consistent pressure and grip angle.
BRUSH GRIP SHOW?
(d) Sketchpens
Regular set of sketchpens.
(e) Thin Microtip Pencil or Technical Pen (Rapidograph) - of Nib Sizes 0.2, 0.3, 0.4, 0.6 and 0.8
Only a correctly held technical pen i.e. one perpendicular to the drawing surface will ensure perfectly smooth ink flow, and consistency of line. Correct speed is again critical while drawing with a technical pen - if one goes too fast, parts of the line will not get drawn due to slower ink flow than say, a sketchpen.
What is a Rapidograph?
A technical pen is a specialized instrument used by an engineer, architect, or drafter to make lines of constant width for architectural, engineering, or technical drawings. A "rapidograph" pen is a trademarked name for one type of technical pen. Technical pens use either a refillable ink reservoir (Isograph version) or a replaceable ink cartridge. (Text courtesy: wikipedia)
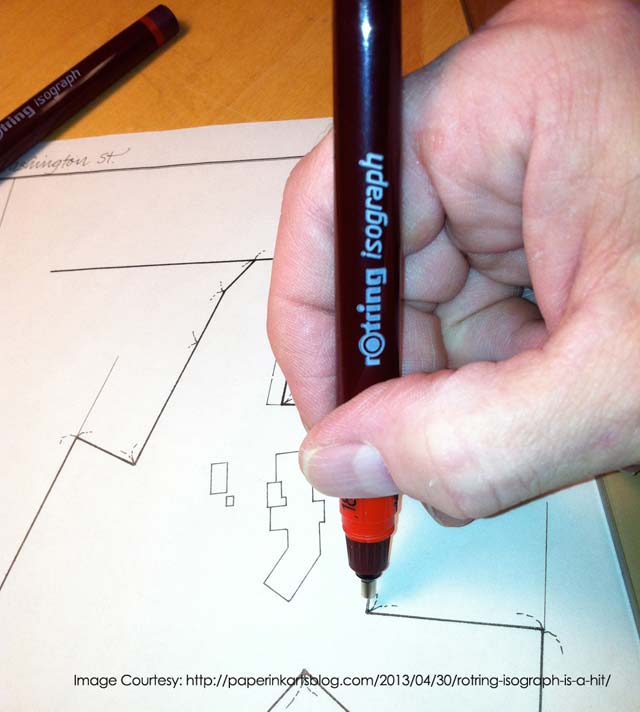
Image 17.2: Drawing with a Rapidograph
3. Exercises:
The day's simple task therefore, is to repeat exercises of all earlier practice sessions (i.e. Sessions 1,2 and 3)
Design your own session today:
Pick any 2 lengths of each variety under each of the broad categories of:
(a) Parallel Lines: Horizontal and Vertical
(b) Inclined Lines: 45, 30 and 60 degrees
(c) Circles: Circles, Ellipses, Quadrants and Segments
Draw sets of 5 lines for each variation.
Also add to your list the practice of starting and ending away from grid (say 2 or 3 cm away) for some lines, to improve line control.
<Workout Ends>
Sense of Perspective Space
Discussion: One point Perspective
For drawing in One-Point Perspective, we arrange our view of the object so that the edges which are perpendicular to the picture plane vanish at one point (VP1) RIGHT AT THE BACK (shown in red dashed lines), and the edges at right-angles and parallel to the picture plane remain horizontal (shown in blue dashed lines), as in the image below.
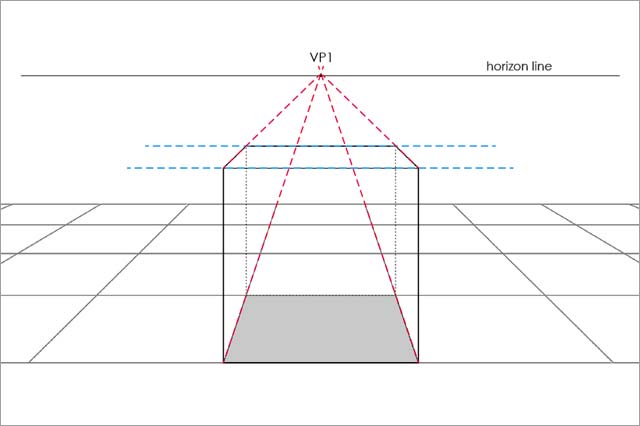
Image 17.3: One-Point or Parallel Perspective
Why 1-point Perspective?
Why choose 1-point perspective over 2-point, 3-point or other forms of perspective for sketching? Since the Vanishing Point in most cases is kept within the drawing area, it is quicker and easier to draw, and allows for effective control of dimension, proportion, perspective and line. Owing to its simplicity, it is a preferred mode of representation in certain cases, as discussed below.
(a) Interior of a space/product:
A single vanishing point effectively implies that for a cube/cuboid, its three inner side-planes (or walls) will be seen if its front face were removed. Ideally used for representation of street scenes, room/car interiors, internal parts of a consumer appliance, etc.
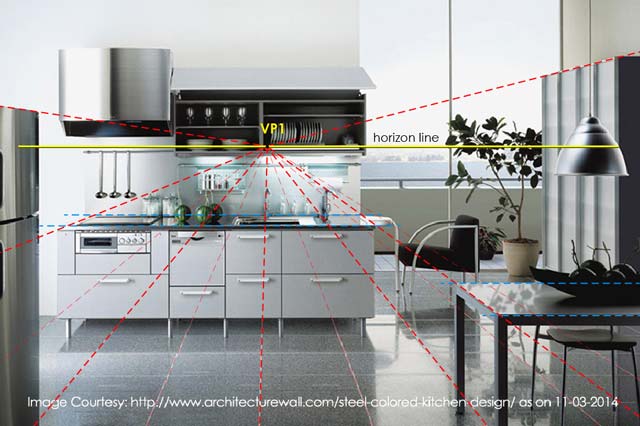
Image 17.4: 3D Visualization of a Contemporary Kitchen Design in One-Point Perspective
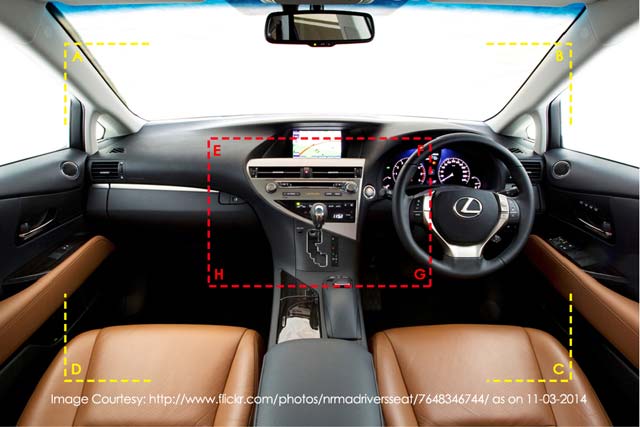
Image 17.5: Car Interior in One-Point Perspective
Note: Some distortions are inevitable in One-Point Perspective, especially closer to the outer frame ABCD (here shown in yellow), while the central area EFGH (demarcated by a red rectangle)will have minimum distortions
(b) Typically Rectangular Objects
in cases where the sides of the product are uneventful i.e. products about which all the information can be conveyed by depicting only one or two primary sides, such as home appliances (washing machine, cooking range, etc.) can be well presented by simple one-point perspectives, as shown below.
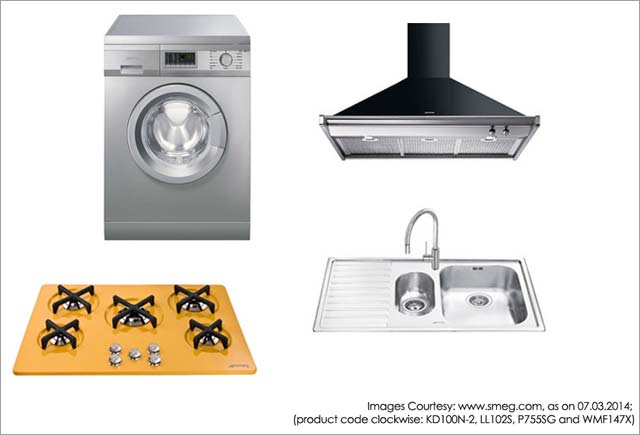
Image 17.6: Common Home Appliances represented in One-Point Perspective
(c) Elevation views:
Observe how this simple side-elevation of a car is able to indicate volume and depth due to its one-point perspective view. Thus, regular elevation views can be given the look of convincing 3D renders with very little effort through one-point perspective.

Image 17.7: Side View of a Car in One-Point Perspective
(c) Cylindrical objects:
In One-Point Perspective, Vertical Cylinders do not taper along the vertical and Horizontal Cylinders can be drawn with just successive perfect circles (assuming Vanishing point lies outside object, midway)
[For more information: See Sense of Perspective Space Day 19]
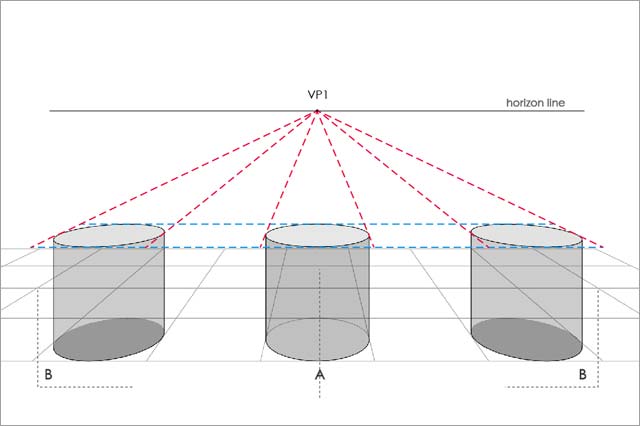 Image 17.8: Cylinders in One-Point Perspective
Note: As you move away from the central zone A towards B on either side, slight distortions will begin to appear
1. Aim: Extension of a Cube in One-Point Perspective
Extension of a cube also effectively means extending the space within, a necessary requirement especially while drawing architectural interiors.
DO NOT USE ERASER - use a single line, do not retrace too much.
2. Set up:
Tracing sheets, measuring ruler.
3. Exercise:
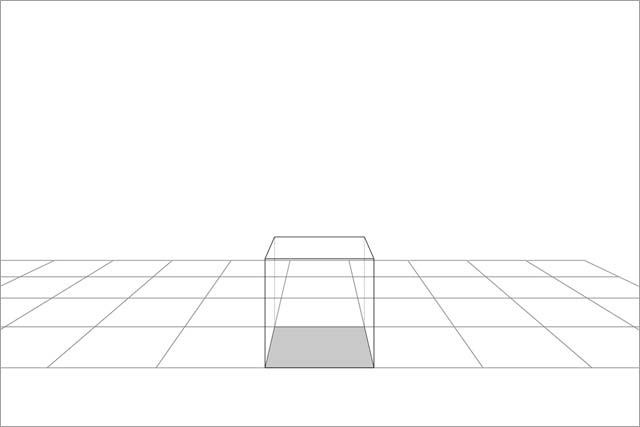
Image 17.9: Floor Grid in One-Point Perspective
Provided above is a floor grid with a 5cm cube in the centre. [Download...D17_5cm-floor-grid-in-one-point-perspective]. This cube, with front face removed, can be assumed to be a hollowed out space, with the three vertical surfaces representing the interior walls of a room. Using an overlay on this, draw the following two cubes. Refer to image 17.10 below:
(a) Horizontal Extension of Cube: along x-axis, towards 'a' (such that oa=10cm). New cuboid will have twice the base area of initial cube.
(b) Vertical Extension of Cube: along y-axis, towards 'b' (such that ob=10cm). New cuboid will have twice the initial cube height.
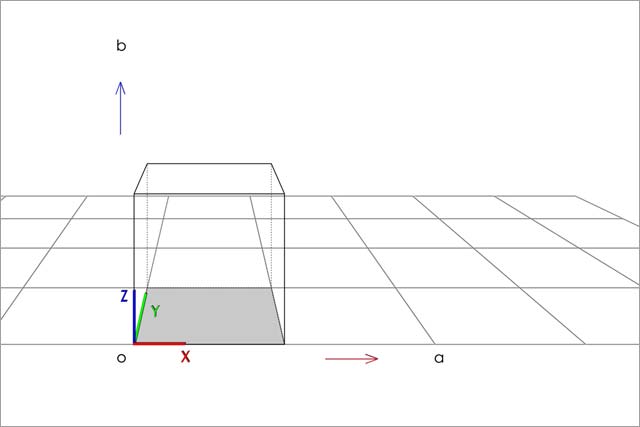
Image 17.10: Extension of Cube Practice Assignment
4. Review: Did you use any specific method on your own, intuitively, to arrive at the right solution?
After doing the exercise, see the simple extension method discussed in the video below. Also, overlay on correctly printed solution sheets and compare for accuracy. [Download... Horizontal Extension of Cube_Solution; Vertical Extension of Cube_Solution]
Observe the solution videos 17.1 and 17.2 below.
Video 17.1: Horizontal Extension of Cube
Video 17.2: Vertical Extension of Cube
< Sense of Perspective Space and Day 17 End >