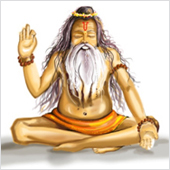
Pencil Illustration basically includes 3 steps:
• Step 1: Skeleton
• Step 2: Tonal Variations
• Step 3: Shading
Step 1: Skeleton
Contour lines of the sadhu are first drawn as outline on the paper. It enables to maintain shading within the contour.
The source of light falling on the figure is decided. In this illustration the top right of the page is considered as the source of direction of light.

Step 2: Tonal Variations
Tonal variations of the shade (light to dark) is drawn. The degree of lightness or darkness of an area can be referred as tone in the language of art. Tone varies from the bright white of a light source through shades of gray to the deepest black shadows. In the illustration, the tonal variation is used to shade the highlights, shadows and depth portions. Darker tone is used for depths and lighter tone is used in highlighted areas. This tonal variation will help to guide the artist to select the right tone while shading the figure of the sadhu.
The general technique of creating a tonal variation is basically done by using higher grades of pencils gradually. For instance 6b pencil gives a darker tone than 4b pencil. Such tonal variations can also be achieved by applying pressure on the pencil. If pressure is applied on the same pencil a dark tone is achieved.
Based on the position of light, you will see that the depth of the figure is achieved by breaking the figure into three tones viz. light, mid and dark using 4b, 6b or 10b suitably. Highlights can be achieved using an eraser also.

Step 3: Shading
Shadows are added studying the direction of source of light. Using 4b / 6b pencils we can fill in shadow areas in the face. Using 6b add details in the nose. Again note that all light and shades are dependent on the source of light.
The contour drawing that we started with is gradually transformed into more three dimensional and realistic figures through the effect of light and shadow. Note that the quality of tones should also reflect the quality of the material – for example the hair, the beads, the cloth, the skin – all have different textural qualities different one from the other. A keen sense of observation will help you to note the subtle differences in the treatment of light and shadow to achieve the right texture.

Furnishing the Details:
Further details are shaded through 5b, 6b, and 10b pencils. The contour drawing that we started with is gradually transformed into more three dimensional and realistic figures through the effect of light and shadow. Note that the quality of tones should also reflect the quality of the material – for example the hair, the beads, the cloth, the skin – all have different textural qualities different one from the other. A keen sense of observation will help you to note the subtle differences in the treatment of light and shadow to achieve the right texture.

Check the Video for details of the step by step process to complete the illustration.

