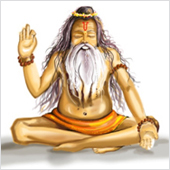
Introduction:
This module helps to learn, how to make water colour illustration of an Indian sadhu. Section of tools, basic painting techniques and procedure used in water colour painting of a human figure is illustrated.
A detailed study of the approach to the water colour painting technique is also demonstrated through a video, where the whole illustration process is recorded.

1 Tools:
Round brushes (No. 11, N0.7, N0.3 and No.0) are used to paint the sadhu. The water colours used in the painting are Burnt Sienna, Cobalt Blue, Sap Green, Crimson, Ochre Yellow, Gamboge The colours are sometimes mixed together to produce relatively different colour tones and shades which is shown in an example below.

Procedure:
1.1 Contour Drawing:
A light contour of the sadhu is outlined on the paper that helps to guide the painter to move his brushes accordingly. Contour drawing is very useful for the painter, it gives an idea whether the different elements in the figure are proportional and at the same time helps to visualize the figure before starting to paint.
1.2 Colouring Process:
Your are encouraged to experiment with mixing colours. A keen eye for observation will help understand tints, tones and shades of a particular colour. This understanding is very useful while painting to understand concept of light and show on three dimensional objects.
Let us assume that the source of light is from the top right of the paper.
• Starting from the top part of the body and moving down in stages to the lower half of the illustration is advised.
• First the hair is to be coloured. For this mix Cobalt Blue, Crimson and burnt sienne.
Adding a bit of white to yellow ochre gives us a whitish tone for the hair.
• We next paint the body.
For this we mix ochre yellow + a bit of burnt sienne + bit of cobalt blue to get the tone of the skin.
• The orange garment on the body is generated by crimson + gamboge.
Brush No.3 can be used for adding details
• For Hair we mix Cobalt blue + crimson+ sap green to get a dark black colour.
• To generate darker skin shades mix burnt sienne + cobalt blue.
• In the second stage we generate mid tones to make the shadow areas more prominent and give the illustration a realistic 3 dimensional feel.
• In the thirst step we add more details using finer brushes (No.3 and No.0).
• Finally the shadow area is painted using brush No.11 again.
• The illustration is ready.
For more understanding, do watch the process demonstrated in the Video.

