Design Course
My First 3D Animation
Introductory
by
3D Software Interface
First we need to be able to feel comfortable with 3D software and know our way around it. This part will give you the basics of the Interface of 3D software.
At first, the interface of the software will look a little daunting as a good 3D software can be very complex and do a lot of different things. But if you know what you are looking for, this will start looking a lot simpler. These are the most common elements you will see in any software.
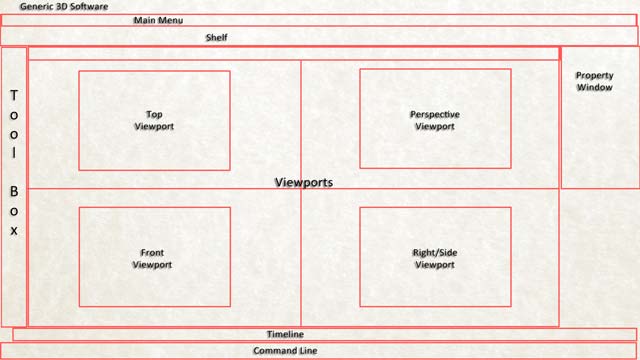
- The Menu Bar: This will have functions like Open, Save, Import, Export, etc. which are common in every software as well as some other functions which are specific to 3D.
- The Toolbox: This will have some of the important tools that you will need very often to animate. The most important among these are the Select, Move, Rotate and Scale tools. The software will also give you the option to select these using short-keys i.e. specific letters on the keyboard for each tool. For example, in Maya these are Q, W, E and R for Select, Move, Rotate and Scale respectively. Find out where these tools are on your interface and the short-keys for them and thoroughly familiarize yourselves with them.
- The Shelf: This is a collection of some important tools that you may need and so they are organized in a logical manner, so that you can easily find what you are looking for and select it.
- The Timeline: Since you are creating animation, you will create a series of images in time. The timeline allows you to create, see and modify animation interactively in time. Here you will set keys i.e. fixed values for various tools like position, rotation, scale or any other parameter that you want to change in time. It will also give you tools to preview in motion that you have created, so that you can know whether your animation is right. You can modify it appropriately if it doesn’t.
- The Viewports: These windows are literally the windows of your virtual 3D world. Using these you can actually see the scene that you are animating. This is dealt in more detail in the next section.
- Various Property Windows: You will also see other windows conveniently placed on the interface, which shows you the properties and their values of the objects and elements in your scene.
- Other important windows: Besides these, there are other windows that you will open and close as and when required while doing animation, but are otherwise not visible in the interface. For example, the Graph Editor, the Material Editor, Render Window, etc. We will deal with these in this and other modules later at appropriate times. But for now, let’s keep it simple.
Check out this video and you will understand the interface better.
Video - The Interface