Design Course
Product Drawing
Representation of Objects
by
Understanding perspective is essential to be able to represent three-dimensional objects with correct proportions, which are more realistic and ‘true’ to the eye. One basic difference between isometric product drawings and product sketching is the visual effect of depth that is achieved through foreshortening.
What is foreshortening?
Foreshortening is distortion due to perspective when an object appears compressed when seen from any particular viewpoint.
What is Vanishing Point (VP)?
Due to foreshortening, if we were to extend these lines of taper, there would appear a point where these lines seem to emerge from, this point is called the vanishing point (VP), as elucidated in Fig. 11.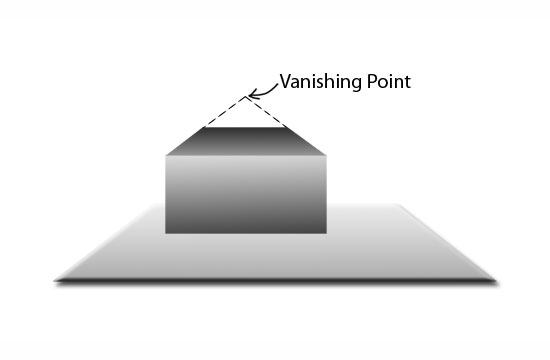
Fig. 11: Foreshortening and Vanishing Point.
For more clarity on the vanishing point, hold an object in front of your eyes, and gradually move it away towards your left and then to your right, up and then down and notice that beyond your cone of vision, this object vanishes. This perimeter region, beyond which the object vanishes from your view, is where the vanishing pointslie.
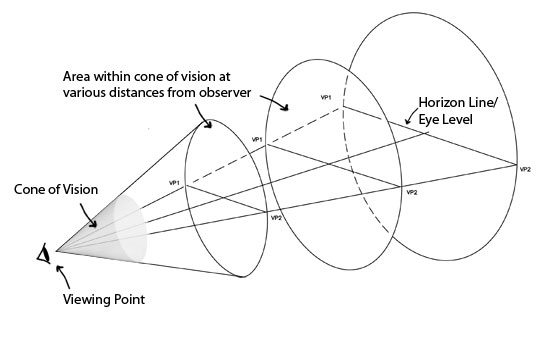
Fig. 12: Vanishing Points (VP) with respect to Eye Level or Horizon and the Cone of vision.
One and Two Point Perspectives:
One and Two Point Perspectives make use of one and two vanishing points respectively.
One Point Perspective:
In One Point Perspective, also known as Parallel Perspective, the object is directly in front of the observer and not at an angle such that its primary surface is parallel to the imaginary frame of view or picture plane.
Mostly adopted to draw spaces, such as interiors of a room or buildings on a street, one will notice that the objects diminish in size, perpendicularly into the paper towards this single vanishing point.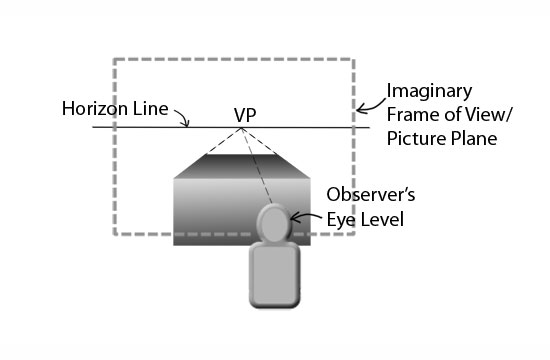
Fig. 13: One Point Perspective.
Exercise 3:
One Point Perspective:
• Assuming a horizon and a single vanishing point, draw a cube in One Point Perspective.
Two Point Perspective:
Two Point Perspectives, i.e. perspectives drawn considering two vanishing points are mostly adopted for object drawing. Designers adopt Two Point perspectives for most of their 3D representation. 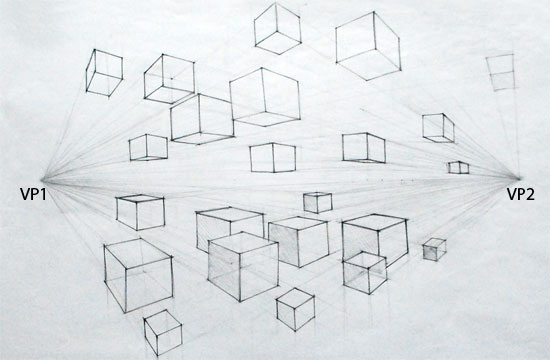
Fig. 14: Cubes in space in Two Point Perspective.
Examples:
Exercise 4:
Cubes in Two Point Perspective:
• Assume a horizon and two vanishing points, as discussed above.
• Extending lines from these points, draw various cubes in space in Two Point Perspective.
Note:
Distortions such as circles becoming ellipses for example, occur when represented in perspective.
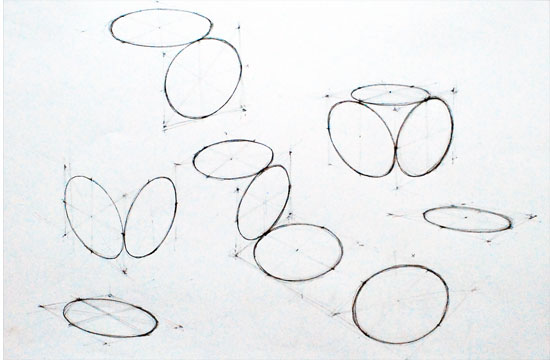
Fig. 15: Circles in Perspective.
Examples:
Exercise 5:
Circles in Two Point Perspective:
• Now draw circles onto those various cubes in space drawn by you.
• Note how the circles get an elliptical profile when in perspective.
Exercise 6:
Treasure Box in Two Point Perspective:
• As you get a hang of the circles and cubes in perspective, try drawing objects that are predominantly combinations of these.
• Draw these Treasure Boxes to begin with. Notice the ellipsoidal reference lines along the edges of the cube, to correctly draw the open lid.

Fig. 16: Treasure Box in Two Point Perspective.
Examples:
