Design Resource
Guitar Making - Dum Dum, Kolkata
Musical Instrument Making
by
Prof. Bibhudutta Baraland Srikanth B
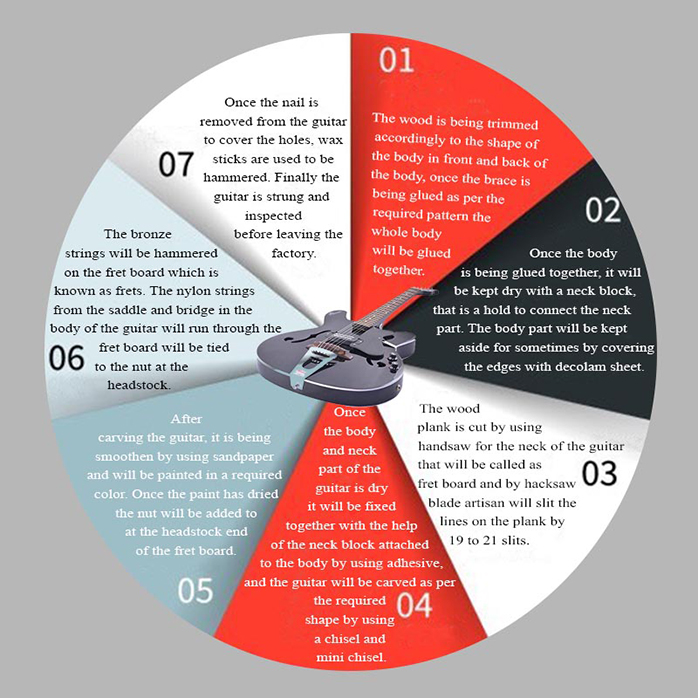
Firstly, the artisan decides on the kind of wood used for guitar making. Here popular options among the craftsmen are usually maple wood and rosewood for their supreme quality. Once the wood is finalized, it is cut from lumber using book matching, a method in which a single piece of wood is sliced into two sheets, both of the same length and width. This step gives the sheets a symmetrical grain pattern. These sheets are then matched to ensure grain continuity and glued together. Once dry, the newly joined boards are ground with sandpaper to the right shape and thickness. The next step comes to cutting the top board to guitar shape. Though it seems to be an oversized shape during the process, it takes the right form after trimming.
A sound-hole with slots is carved around this newly formed shape to incorporate concentric circles that act as decorative inlays around them. Next, wood braces are glued to the top piece's underside for two functions, one to brace the wood against the pull of strings and the second to control the maximum vibrations, both to achieve the right musical tone. The process of brace fixing is popularly called Shrutting, a method that differs from company to company. Commonly, braces today are glued in an X-pattern, but here at the Hovner Company, the artisans follow a unique style: their trade secret. This confidential design adds immensely to the guitar's sound quality. Here strips of wood are set parallel from left to right till the glued joint at the long end of the guitar. Similar to the top portion, the back is also cut and glued, followed by a book-match technique. Then finishing the sides by cutting and sanding strips of wood, the structure is soaked in water for softening of wood. Once removed from the water, these strips are placed into molds for achieving the curve shapes required for the instrument. The entire assembly is then clamped for a while to ensure symmetry between the two sides. It is then glued to the inside walls with basswood-based adhesive. End blocks are also used to join the top, back, and neck areas of the guitar. Once both sides and end blocks are ready, they are attached to the top and the back area of the body structure. Here excess wood is trimmed off, and slots are cut along the side-top and side-back junctions for body bindings. The bindings are not only decorative but prevent moisture from entering through the sides, thus warping the guitar. The neck is made up of hard rosewood carved to exact specifications. This neck is inserted with a reinforcing rod and sanded before the fingerboard is fixed over them. Using precise measurements, frets of steel wires are put in place to make fretboard. Once the neck construction is finished, it is attached to the main body by fitting a heel that extends to the pre-cut groove on the wood body. Once the heel dries up, the entire guitar is coated with a layer of sealer, followed by several coats of lacquer. In some cases, intricate decorations or inlays are also worked on the guitar top. Then a bridge is attached near the bottom of the guitar below the sound-hole, and a saddle is fitted. It is made sure that the nuts placed between the head and neck of the guitar are tightened. The nut is a strip of wood or plastic on which the strings lie as they pass to the head and into the tuning machine. The tuning machine is the most delicate part of the guitar and is usually mounted on the back of the head. The pegs that hold each string are housed in metal casings. Finally, the guitar is inspected for quality assurance before packing up from the work area. The entire process of guitar making takes around seven days, which largely depends on the artisan's intent to decorate the guitar top or leave it simple.
Flow Chart:


