Design Resource
Pethapur Block Making
Documentation of the fine craft of Block Making
by
The process of creating a carved block from a solid hunk of teak wood employs a panoply of tools that the craftsperson must master. Some tools are employed in preparing the block before and after carving, tools that are used to carve the block itself, and a few other implements that act in support.
Preparation of the Block:
The first step in the process is to cut adequately seasoned wood roughly to the design's size, filed with a number of files and tools, and then be polished in preparation for the etching process. Through a recent change, the first round of leveling is done with a sanding machine, after which a Randha (carpenter's plane) and hand files are used.
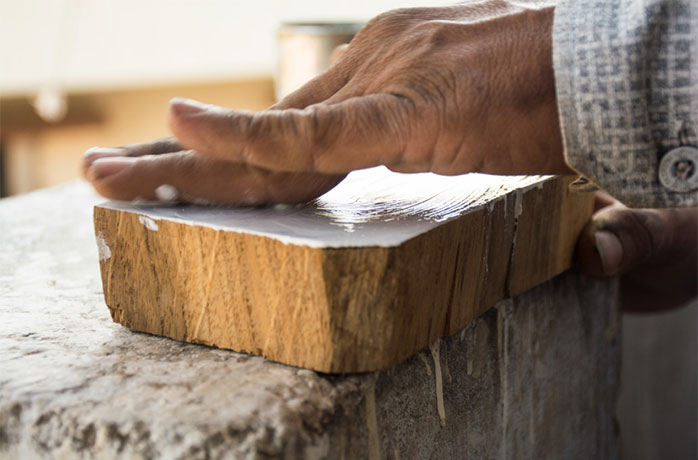
Figures show the process of how an uneven piece of wood is made level through the process of sanding, filing, and polishing, which is a crucial first step. If there are any mistakes in these processes and the block remains uneven, the design would not press upon the fabric evenly and subsequent steps in the process rendered pointless.
The river stone used in the figure is a rarity now. Artisans are always on the lookout for the polishing stone, made wet and layered with a crushed rock before grinding the block on it in large circular strokes. This step is demanding but remains an integral part of the process.
Etching of the Block:
The second step in the process is to etch the design onto the block and is called Tipai. After polishing, the craftsmen apply a thin coating of white poster color diluted with water (which used to be lime paste in the past) against which the minute etchings would appear.

Applying a thin coat of white poster paint on the surface of the block.
Poster paints have replaced lime paste since they do not need to be prepared and give the surface a smooth finish. Craftsmen still apply this with their fingers through and have to be careful about the coat's thickness. Overly thick layers peel off, and overly thin layers make it difficult to see the etchings.
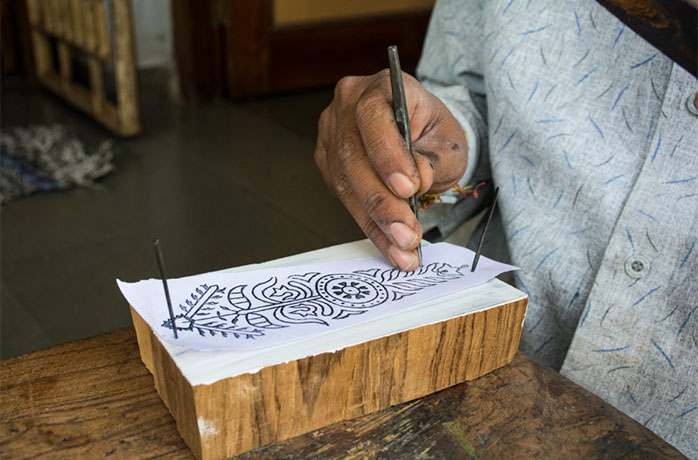
Once the paint has dried, an impression (or drawing if its the first time a design is being made) of the intended design is affixed to the wooden block with small nail-like tools called Tichaniya and lightly traced with tools similar to the carving tools but slightly more blunt that are called Tipai ke Takne.

Applying a thin coat of white poster paint on the surface of the block.
After the design has been lightly traced on the block, the craftsman gives it a once-over with the same Tipai ke Takne in a variety of shapes of sizes: from the straight-edged ones to ones with a curved carving edge in a range of sizes in a process called Pakka Karna ('Making the Lines Solid').

The Tipai process is done with tools similar to the carving chisels (called 'Takne'). The wooden mallet seen here in Chetanbhai's left hand is also a lighter, smaller version of the mallet used for chiseling to allow for quick, light hammering action. The etching has to be deep enough to be visible to the craftsman while engraving but not so deep as to create chips in the edges of the final design. One may also notice etching tools of varying sizes on the artisan's stool. A skilled artisan should be able to select the right sized Takna from those available to them to trace the designs with.
Drilling of the Block:
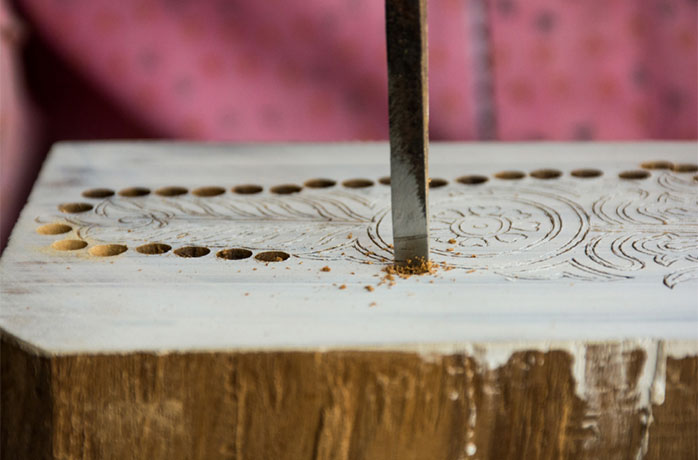
Once the design is etched, the artisan drills hole around the edges of the design. This is called 'Saarna' and achieved with differently-sized drills called Saedi or Saar, which resembles an ice pick except with a three-pronged trident drilling point.

Holes being drilled along the edges of the design.
A long stick of wood supports the Saedi with its end strung together with a long, loose string called Kaamthi. This string is wrapped around the Saedi twice or thrice, which makes the Saedi rotate when pulled. The Saedi's head lodges into the hemispherical cavity of a hard, smooth piece of Imli (Tamarind) wood that acts as a swivel for the Saedi and is called the Mathaa. Suppose the artisan is right-handed; he pulls the string wrapped around his fingers with his right hand and supports the Saedi lodged into the cavity of the Mathaa with his left hand, letting the Saedi freely rotate back and forth.
Connecting the Holes:
The holes once drilled are 'connected' by removing the thin walls of wood separating them, which is achieved by flattening them with a flat-edged iron tool called the Thassa. The Thassa is struck with force by a heavy, wooden beam acting as a mallet called the Thapri.
The artisan tries to achieve an even 'floor' at the bottom of the holes to connect them. An intermittent step between this and the next is removing the wood between the inner nooks and corners of the motif with a tool that has a sharp, V-shaped end called the Nakhya.
Chipping Away Excess Wood:
The excess wood around outside the design is chipped and shaved away in a process called 'Phurdah Girana'. The tool used to accomplish this has a thick, angled cutting blade called a Farsi.
The artisan first creates a groove along the block's sides at the required depth of the design. Starting at the edges, he chips away at the excess wood with the sharp edge of the Farsi, which collapses due to the groove underneath. Resting it on the angled side, he hammers the Farsi to shave away the chips so created, letting the Farsi 'glide' over the new surface. Alternating between chipping away wafers and hammering them out with the Farsi, he is able to remove the excess wood.
Final Carving of the Design:
The most important and penultimate step of the process is the final carving out of the design, which is known as Gadhai. The Gadhai process is achieved with an extensive range of Takne (plural for Takna).
Primarily there are two kinds of Takne, a Chaursi, a sharp, straight-edged chisel for straight lines and the outer edge of curves, and a Gol Punthia, for the inner edges of curves. One thing to note here is that regardless of how small a role a tool may have, it has a name.
The carving is actually done in two rounds. The excess wood around the motif is not shaved entirely in one go. This is to prevent damage to the motif's edges and preserve their sharpness. The excess acts as a 'buffer' against the chisels' motion, and it is also easier to shave away the wood the thinner it becomes. The right-handed artisan hammers with a Thapri in his left hand and the chisel held in his left, letting it 'dance' up and down around the edges with the hammer to remove the remaining excess. Every so often, the artisan would also scoop out the Kucha or waste wood with his Takna.
Of all the different steps of the process, Gadhai is the most difficult to describe in words and perhaps the hardest to master since even the slightest misstep can cause damage to the edges of the designs, warranting repairs later. The entire Gadhai process can take anywhere from 2 to 7 days depending on the design's intricacy, requiring regular sharpening of the chiseling tools.
A skilled artisan must be able to decide which Takna should be used where taking into account both the shape and the size of the tool. If the Takne is too small, the process will become unnecessarily long, and if it is too large, it can damage the motifs.
Dedicated blacksmiths made Takne in the olden days, but now they have to be found in the collection of deceased artisans or fashioned from bicycle spokes or steel rods of similar dimension, although making new ones is rare. Artisans are extremely possessive about their tools and still use their forefathers' chiseling tools many decades ago.
Finishing of the Block:
The last stretch of the block making process is that of finishing the block. It consists of beating down the uneven surface on the inside of the motif (known as 'Thass Lagana'), shaping of the block with saws and files, attaching or carving of the handle called a Pakad or Haatha, and storing the block immersed in sunflower oil in a process called Tel Pilana (loosely translates to feeding oil). The wood is stored in oil (most commonly mustard oil) to make it insect and water-resistant. Lastly, artisans attach blunted pins or carve out 'repeat points' that enable perfect placement of the blocks during printing.


