Design Resource
Silver Casting - Madurai, Tamilnadu
Creating the Intricate Designs
by
Prof. Bibhudutta Baral and Guna D.
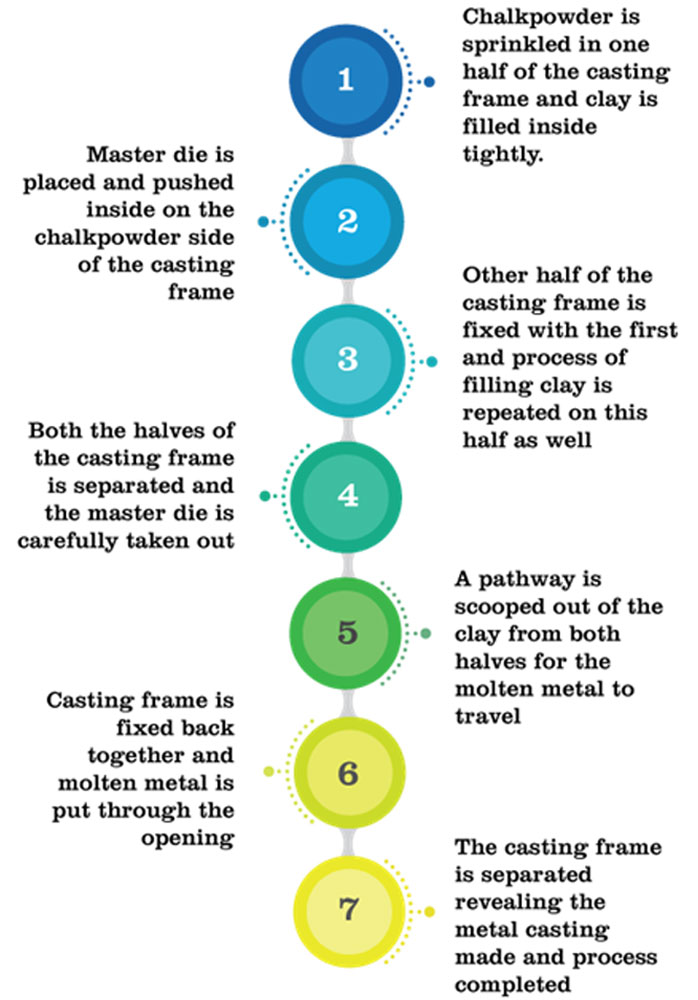
Making Process
The process for sand casting consists of six main stages, which are:
• Mould-making - The first step in the sand casting process is to create the mould for the casting. In an expendable mould process, this step must be performed for each casting. In horizontal casting, the mould is contained in a two piece frame, called a flask. The upper portion of the flask is called a cope and the lower portion is a drag. First, moulding sand is packed into a flask around the pattern. After the pattern is removed, gating and runner arrangements are positioned in the drag half of the mould cavity and the sprue is placed the cope portion. Gating systems are necessary for the molten metal to flow into the mould cavity. Cores are also placed in the drag portion of the mould if they are needed. To finish the mould, the cope (top) section is placed on the drag (bottom) section, and the mould is closed and clamped together.
• Clamping - Once the mould has been made, it must be prepared for the molten metal to be poured. The surface of the mould cavity is first lubricated to facilitate the removal of the casting. Then, the cores are positioned and the mould halves are closed and securely clamped together. It is essential that the mould halves remain securely closed to prevent the loss of any material.
• Pouring - The molten metal is maintained at a set temperature in a furnace. After the mould has been clamped, the molten metal can be ladled from its holding container in the furnace and poured into the mould. The pouring can be performed manually or by an automated machine. Enough molten metal must be poured to fill the entire cavity and all channels in the mould. The filling time is very short in order to prevent early solidification of any one part of the metal.
• Cooling - The molten metal that is poured into the mould will begin to cool and solidify once it enters the cavity. When the entire cavity is filled and the molten metal solidifies, the final shape of the casting is formed. The mould cannot be opened until the cooling time has elapsed. The desired cooling time can be estimated based upon the wall thickness of the casting and the temperature of the metal. Most of the possible defects that can occur are a result of the solidification process. If some of the molten metal cools too quickly, the part may exhibit shrinkage, cracks, or incomplete sections. Preventative measures can be taken in designing both the part and the mould and will be explored in later sections.
• Removal - After the predetermined solidification time has passed, the sand mould can simply be broken, and the casting removed. This step, sometimes called shakeout, is typically performed by a vibrating machine that shakes the sand and casting out of the flask. Once removed, the casting will likely have some sand and oxide layers adhered to the surface. Shot blasting is sometimes used to remove any remaining sand, especially from internal surfaces, and reduce the surface roughness.
• Trimming - During cooling, the material from the channels in the mould solidifies attached to the part. This excess material must be trimmed from the casting either manually via cutting or sawing, or using a trimming press. The time required to trim the excess material can be estimated from the size of the casting's envelope. A larger casting will require a longer trimming time. The scrap material that results from this trimming is either discarded or reused in the sand casting process. However, the scrap material may need to be reconditioned to the proper chemical composition before it can be combined with non-recycled metal and reused.
Flow Chart: